Sod is a quicker alternative to seeding your lawn. It is also more reliable, as seeds can sometimes fail to sprout.
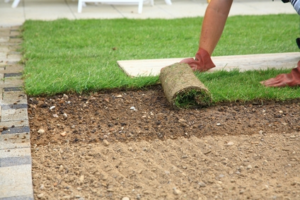
Start by dampening the soil and raking out any footprints. Then, find the longest straight edge in your yard and unroll the first sod roll along it. Contact Sod And Turf Harrisburg PA now!
Sod is a great option for homeowners that want a lush, green lawn without the hassle of seed. It also provides a quick solution for frequently used areas or needing to be repaired, such as around swimming pools. Unlike artificial turf, sod is made of natural grass that provides a habitat for insects, helps with air purification, and reduces soil erosion. While sod may be more expensive upfront, it can save on maintenance and water consumption over time.
To ensure the success of your sod project, it is important to choose the right grass for your yard. Consider the amount of sunlight your yard receives and if any shade areas exist. Also, take into consideration any existing trees or plants that will compete with your new grass for nutrients and moisture.
A good starting point is to look for a high quality, locally grown sod that is suited to your area and climate. It is also a good idea to hire a professional sod grower who has a reputation for producing high quality sod and turf. They can help you select the right grass for your landscape and help with installation.
When choosing sod, look for a variety that is tolerant to shade and drought. Some common types of sod include tall fescue, perennial ryegrass, and fine textured Kentucky bluegrass. The type of sod you select will depend on the amount of sun and shade in your yard, as well as your soil type.
Another benefit of sod is that it can be installed at any time of the year, whereas seed is limited to a small window of time in which it can be laid. When laying sod, it is best to avoid freezing temperatures or very hot weather, as this can shock the new sod and cause it to die.
After sod is installed, it should be watered daily to ensure that the roots are properly hydrated. It is also important to water in the morning, as this allows for a better soaking of the soil than if you water at night.
Preparing the Soil
The best way to get a beautiful lawn is to lay sod or turf, but it’s important to prepare the soil well before you do. The soil needs to be soft and loose so that the roots can penetrate easily. If it’s too hard, the grass will have a difficult time growing and will not thrive. You can do this by tilling the area or, for an equipment-free option, using a liquid soil loosener. This product aerates and conditions the soil, preventing crusting and hardpan and making it ready for new sod or seeds.
Soil type and water quality are also important considerations when laying sod. Sandy loam soil is preferred, although sod can be planted in a variety of soil types. Soil should be well drained; otherwise it will retain too much moisture, leading to stress for the sod and weed problems. Soil should be tested to determine its pH before sod is installed; lime or gypsum may be needed to bring it to the recommended level of 5.5 to 6.0 on organic soils and 6.0 to 6.5 on mineral soils.
Before sod is laid, weeds and existing grasses should be killed with a non-selective herbicide like glyphosate. It’s best to do this a couple weeks before your sod delivery, so that the weeds and grasses have time to die off. This will also help prevent weeds and grasses from competing with the sod for moisture and nutrients.
To prepare the soil for sod, it should be tilled and graded to ensure proper slopes, drainage and protection of structures, driveways and walkways. Soil should be a minimum of 1 inch below the grade of any paved surfaces. It’s also a good idea to spread topsoil or compost on the soil to improve its structure and nutrients.
Soil should be kept moist during installation, a process that can take a couple weekends on average. You can tell if the soil is moist by poking it with your finger or with a handheld probe (available at home and garden centers). It should feel moist 3 to 4 inches below the surface.
Laying the Sod
Many homeowners enjoy the challenge of tackling do-it-yourself home and yard improvement projects. However, some jobs should be left to professionals. This is especially true when laying sod. Sod is more than just a piece of grass, it’s a living plant that needs immediate water and nutrients to thrive. It takes time for sod to develop a root system, and it’s important that it is installed correctly.
To begin, determine how much sod you need by measuring the area in feet. A tape measure or surveying wheel will work, but there are also smartphone applications that can help you with the measurement process. Make sure to subtract areas such as driveways, sidewalks and non-turf landscaping. Then, divide that number by 9 to get the number of square yards you will need. It’s a good idea to purchase 5 percent more sod than you need to ensure that you have enough when it comes time for installation.
It is best to lay the sod as soon as possible after delivery. Fresh-cut sod has a limited life span, and it doesn’t tolerate sitting on the pallet for long periods of time. It will also not survive if it is stored in hot and dry conditions. So, it is crucial to prepare the soil and have irrigation ready for sod installation when the time arrives.
When laying sod, start at the longest edge of the landscaping and move outward from there. It is important to maintain tight seams and not leave any bare spots in the landscape. This will prevent weeds from fighting through the sod, and it will also provide a smooth mowing surface.
Using a sharp knife, trim the edges of the sod if necessary to create a uniform appearance. This will also keep the sod from becoming loose and falling off of the ground. Once all of the sod is laid, use a garden hose to thoroughly soak each section.
When you are finished, you will have a beautiful, lush lawn that is sure to impress any guests. If you follow these tips, you will be on your way to having a low-maintenance landscape that is easy to maintain.
Watering the Sod
Sod needs to be watered frequently to keep it hydrated and to help it establish roots in the soil. New sod should be watered the day it is installed and for a week afterward. Consistent watering will prevent shrinking and drying. Watering is best done in the morning and should be kept up until the soil feels moist and spongy. Areas that are closer to driveways and sidewalks dry out faster due to heat transfer and will need additional watering.
New sod should be watered to the point that you can see water on the surface of the soil, but not so much that the soil is muddy. Lift up a corner of the sod and stick your finger in the soil to make sure it is saturated – it should feel spongey. This first watering also rids the sod of air pockets that could harm it by drying it out.
Once the sod is rooted in, it will begin to take on more of its own watering schedule. New sod should be watered a minimum of twice a day, once in the morning and once in the evening (before sunset) for several weeks. Watering in the morning is preferred, as it allows for better evaporation and cooler temperatures. Watering in the afternoon can cause the sod to get hot and dry out quickly.
Overwatering can be just as harmful as not watering enough. Soggy soil or fungus are key indicators that the sod has been watered too much.
Soggy soil can lead to a variety of problems, including root rot and sod failure. Fungus is a major concern because it will kill the sod before its roots can take root and provide proper support for the sod. To avoid fungus, you should water your sod until it is moist to the touch but not soaking wet.
It is very important to keep pets and children off of new sod until the roots have firmly taken root in the soil. Walking on new sod too early can result in the sod failing and can create voids in your yard. It is recommended to wait until the sod has been mowed a few times before walking on it.